
Simon K Jones shares his tips for wrangling large manuscripts

Simon K Jones shares his tips for wrangling large manuscripts.
Part of our Early Career Writers’ Resources pack on Structure, supported by Arts Council England. Discover more here →
Finding the right structure for your novel isn’t something that only happens at the beginning of a project; it will mutate and evolve throughout the writing of the first draft and well into subsequent rewrites and edits.
When you first start planning a new project it can be difficult to visualise what its final shape will be, which is why it’s difficult to get the pacing right in your first draft. At the other end of the process, a completed manuscript becomes so large that it becomes a challenge to find a clear shape within the mass of text, with chapters blending together in your mind.
Designing the structure of your book or performing structural edits after you have your first draft are difficult tasks for any writer. They combine all of your artistry and creativity with a real nuts-and-bolts practicality, requiring you to understand deeply how all the component parts of your story work together. You need to perceive your novel simultaneously at the micro level (on a sentence and word scale) and at the macro-level (being cognisant of the invisible scaffolding that is holding it up).
This became a lot easier for me when I incorporated the Scrivener software into my writing process. It lightens the technical load and makes it easier for me to focus on the story, rather than spending my time struggling with inadequate word processor interfaces.
I’m going to be talking about how I use Scrivener to structure my novels, but remember that it ultimately doesn’t matter what tool you use, as long as it works for you. If you achieve the same results with different software, or away from the computer entirely, then all is well.
What is Scrivener? It’s a writing tool designed specifically for anyone writing something longer than a letter. In particular, it’s very useful for novelists and is packed with handy features you don’t tend to find in standard word processors. You can find out more at https://www.literatureandlatte.com/ This article was written independently – Simon just really likes Scrivener.
A view from the top
Something that separates Scrivener from most word processors is that it deconstructs your projects into component parts. Although Word and Google Docs can generate useful tables of contents based on in-line headings, they’re still designed around the concept of a single, linear, continuous document. Especially when you get to editing, this presents your manuscript as an intimidatingly huge wall of text. I’ve heard of some writers saving each chapter of their book as separate Word files in an attempt to apply clearer structure, which sounds like a whole different type of pain.
Do you ever make notes of ideas that occur to you while you’re writing? Or perhaps think of a great line or paragraph for another, later part of the book? In a standard word processor you have two choices: tag it on the end of the document, which makes the bottom of the manuscript messy, or saving it in a separate notes document. Same goes for planning out future chapters.
Scrivener takes a different approach, exposing your project’s structure from the very beginning. This can be by whatever measure you find most useful: scene-by-scene, or chapter-by-chapter, or anything else. Here’s an example taken from my novel The Mechanical Crown:
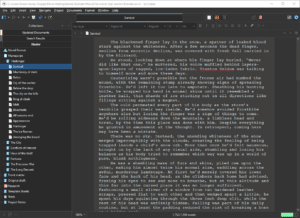
On the far left you can see the ‘binder’, which is how you navigate around your project in Scrivener. Note that my manuscript is split into seven folder, starting with ‘Harbinger’ and ending with ‘The Long Descent’. These are the different sections of the book, with each one containing multiple chapters. The first part of the book, ‘Harbinger’, is open and visible, displaying the 14 chapters within. The first chapter, ‘Survival’, is selected and its text is displayed to the right (this functions identically to a normal word processor, so once you get down to writing it’s as simple and effortless as any other writing tool).
At a glance this undoubtedly looks more complicated than simply tapping away in Word or Google Docs. But look more closely: I’m able to jump to any point in my book with a single click in the binder, and have a clear sense of the macro pacing of the book by how many chapters are in each section. It’s a long book at 260,000 words and having this structural overview so easily accessible is invaluable.
Chapters can be dragged up and down the binder. You can also create placeholder chapters, which is useful when planning ahead or working on a significant edit. My third book, No Adults Allowed, had a highly regimented structure in which the chapters were effectively a countdown to the finale, with chapter numbers descending in reverse order, and Scrivener made it easy to plan out that structure in advance so I always knew where I was in the overall story. Building the story skeleton ahead of time made it possible to hit the very specific pacing requirements of the story.
Here you can see the entire book’s structure laid out in the binder:

On the right I’m viewing the ‘corkboard’. This works like a stack of sticky notes, representing each of the chapters. You can write summaries onto these cards which are separate from the manuscript text itself. If you’re the sort of person who likes to arrange their thoughts on tiny bits of yellow paper, then this is for you. The difference between this and a physical corkboard or whiteboard is that your notes are directly linked through to the manuscript itself.
Everything in its right place
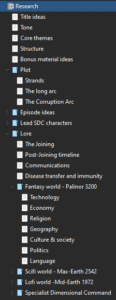 If you’re the sort of person who hoards research, Scrivener keeps all of that in one place as well, rather than leaving it scattered around your hard drive. My next serialised project, currnetly in development, already has 14,000 words in the research section even though I haven’t written a single sentence of the actual manuscript. Each research item, whether it be text, an image or even an imported web page, is listed individually and you can group and organise them however you wish.
Referencing a research or planning document while writing the manuscript is a simple matter of splitting the view in half. Because everything is available under one roof, in a single Scrivener project, it’s easy to cross-reference. I imagine this is invaluable for non-fiction writers and writers of historical fiction.
Into the details
If this is all sounding complex and terrifying, don’t worry. Scrivener adapts to your way of working. You can keep things simple at first, using it like you would any word processor, only making use of its fancier features as and when you need them. The learning curve is often over-emphasised, especially relative the immense benefits of it as a holistic tool for your writing.
When you’re ready to start taking advantage of Scrivener’s more unique features, one area to investigate meta data. This helps you to organise your chapters and documents within the project. You can set the current status of a chapter, such as first draft, or final draft. Or you can set custom labels and keywords, perhaps to track which character is the main narrator in that chapter.
I’m in the process of editing one of my books and have been using these features to keep track of progress. Take a look:

The colour coding helps me at a glance to check progress on the edit. As I was deciding what work needed doing, especially from a structural perspective, I marked each chapter as falling into a particular colour-coded category: ‘Needs total rewrite’, ‘New chapter’, ‘Needs expansion’ and ‘Needs some redrafting’. This gave me an overview of how much work was required during the editing process. As I work through the chapters I switch them to be labelled ‘Complete’, which turns them green. It’s a visual marker of progress.
If you’re thinking that all sounds like a lot of administrative work, you’d be right – but nobody said writing a novel was easy, and working on a structural edit in particular is a challenging technical task. This meta data only needs to be created once, though, and it will then help you to speed up your editing dramatically. It’s an investment up front to make the subsequent work faster, easier and, ultimately, higher quality. You no longer need to remember precisely where every sentence sits within the manuscript, because you have the ability to zoom in and out of your project, from its broad strokes down to individual words.
Be fearless
During the writing of a first draft and especially when you get to editing, it can be hard to let go of favourite lines or even entire sections even if you know it’ll improve the overall quality of the story. If you have a drastic idea but you’re not sure if it’ll work, do you write it in a separate document or risk messing up your primary manuscript? What if you get in a muddle with all the different versions and accidentally delete the wrong one?
In Scrivener it’s easy to try out big changes, without putting the project – or your sanity – in any danger. Adjusting the order of chapters is as easy as dragging them up and down, either in the binder or on the corkboard. You can even create a temporary ‘collection’ of chapters in which you can be as experimental as you want and preview the results, without affecting the flow of your main manuscript.
You can also take ‘snapshots’ of chapters at any point, which stores the chapter in its current state. If you ever want to reinstate an older version or simply compare versions to see whether your changes were successful you can do so with a couple of clicks. If you’re about to embark on a risky, ambitious rewrite of a chapter, simply grab a snapshot first and be confident that you can switch back if it doesn’t work out.
As with everything else, this is all kept inside the one Scrivener project for that book, so you never get into versioning difficulty or end up with a million files on your computer called ‘Novel v11 Final Final FINAL alt’. It removes some of the pitfalls of editing and rewrites and keeps your project safe, which in turn frees you up to be as experimental as you want.
Compiling
Your Scrivener projects inevitably end up being representations of your brain. Perfect during the writing process but not so useful when it comes to delivering the finished manuscript to agents, publishers or readers.
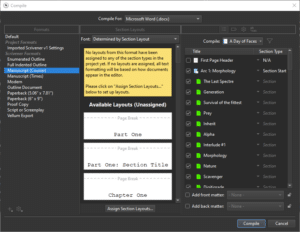
Fortunately you don’t tend to give them your Scrivener project. Instead, you hit the compile button and Scrivener spits out a tidied-up, easy-to-read file in your chosen format – be that Word, PDF or ebook – and styled appropriately for its intended purpose. In fact, you can output to multiple different formats from the same original manuscript, without needing to spend hours manually typesetting and fiddling with fonts, line spacing and margins.
Using better tools is about giving power back to the author. It moves the clicking of buttons and tapping of keys out of the way so that we can focus on the words. A good tool, whether you’re a writer, a construction worker, a painter, a gardener or anything else, saves you time and helps you get the best possible results for each project.
As I mentioned at the top, while I’m (clearly) a massive Scrivener fan, it ultimately does not matter what you use for your writing, as long as it works for you. If you prefer to use Microsoft Word, or a handwritten notepad combined with sticky notes stuck to the wall of your kitchen that’s perfect – but if you find your current setup frustrating, or think you can maybe work smarter, Scrivener is worth trying. There’s a generous free demo.
If you found this article helpful, you can subscribe to my newsletter at https://simonkjones.substack.com/ for more. Do let me know if you have any follow-up questions. Happy writing!